Saturday, January 27, 2007

Orange Loaf

I like to bake things and take them to parties. I figure anyone can pick up a bottle of wine - so it's a little more special to bake something.


However, I don't have infinity free time. So I am always on the look out for recipes with a good tasty/effort ratio. This citrus loaf fits recipes. Everything is really good - but there are no the bill perfectly. I like the simplicity of Ina Garten'sfrou frou trendy ingredients to add. No cocoa nibs or Meyer lemons or any thing they might not have at the down-market grocery store I shop at. Another thing I love about this recipe is the use of plain yogurt and oil instead of butter and buttermilk. I never have buttermilk in the house, but I almost always have plain yogurt. Addionally, using oil instead of butter makes the batter really quick to mix.

I used orange in the loaf, and I first heard about this recipe from Smitten Kitchen, where she uses grapefruit. I think any citrus would rock in this cake.

Tuesday, January 23, 2007

National Pie Day

Today I found out about a wonderful American holiday: National Pie Day. The National Pie Council created the holiday for "love and enjoyment of pie eating". Sadly I found out about the holiday too late to make a pie - and really, making a pie is a lot of work for a school night. But Paul picked up a raspberry rhubarb mini-pie so we could join in the celebrations.

Saturday, January 20, 2007

A soup, a stew and chocolate pie.

I had a few things on the go Saturday. I made cream of corn soup to give to my grandfather. The recipe is from the Complete Canadian Living cook book. It is fantastic: sweet, spicy and easy.

While the soup was cooking, Paul helped me whip up some "lentil cassoulet" - although I left out the duck confit and halved the recipe. This lentil stew is definitely a recipe I will be making again. Sadly, like all my lentil dishes, this stew is madly unphotogenic. But this is the perfect thing to make if you have just been out for a cold winter walk.


The main attraction for this Saturday night has to be the chocolate custard pie I made to take to my parents for Sunday dinner. This little pie is a hybrid of the chocolate custard pie from "the Joy" and the chocolate pots de creme recipe from the Nov 2006 Cooks Illustrated. The main difference from the Cook's Illustrated recipe is I added corn starch to make the custard a little thicker - and thus more suitable for pie. A bonus feature of adding corn starch is the likelihood of overcooking, which produces a grainy custard, is lessened. This is because the starch prevents the protein in the eggs from producing little yucky clumps. But, it is essential that the custard is brought to the boil, otherwise there is an enzyme in the egg yolk that will digest the corn starch. So you pie that was perfectly set on Saturday night will end up a little watery and soupy. Quick aside, I learnt all this from On Food and Cooking. It's a little dry, but I like to know why things work in the kitchen so when I start frankensteining recipes together they are more likely to work.

When I tasted the custard after it was cooked I was a little worried because it did not seem sweet enough. But when it cooled down the sweetness came through. The custard was still a little soft for a pie filling. If you know how many custards you need it is maybe easier to fill some little dishes. But I am never sure how many will be at my parents for dinner, so it is better to make a dessert than can be cut - thus the pie.

The corn starch really helped the texture. I didn't need to use a candy thermometer to cook the custard and I didn't have to stress about over cooking it.


Chocolate Custard

8 oz 70% cocoa chocolate, finely chopped (I used Lindt brand, if you have 60% use 10oz)
5 eggs yolks
5 tbsp sugar
3 tbsp corn starch
2 cups 18 % cream
1/4 cup milk
1/2 tsp instant coffee
1 tbsp vanilla
9in baked pie crust (I use an oreo cookie crumb crust).

1. Place chocolate in a large heat proof bowl. Find your mesh strainer and have it handy.
2. Mix sugar, yolks, corn starch, cream and milk. Cook over medium heat until mixture starts to simmer. Adjust heat to keep mixture just simmering. Simmer for 1 minuet.
3. Pour milk mixture through the mesh strainer over the chocolate. Let sit for 5mins. Add instant coffee and vanilla and mix until chocolate is dissolved.
4. Pour into custard dishes or prepared pie crust.

Saturday, January 06, 2007

Onigiri, Or how I learned to love the rice ball

Last summer, after I got back from Japan, I said I would never eat another rice ball. But then I saw a super cute rice ball mold at the Asian grocery store and I started to reconsider my rice ball decree.

Over the holidays, my friend Simon came over and taught Paul and I the way of the onigiri. Simon will have to vouch for the authenticity of the technique. (I don't care if it isn't authentic, Simon taught me how to cook rice - something I was never able to do before.) I think the onigiri would be awesome to take for a picnic.

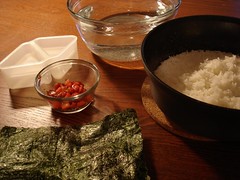
Some notes on the ingredients. The seaweed I got in China town. You can probably find it at any Asian grocery store. The filling for the rice ball could be any little bit of leftover you might have. Simon suggested using spicy tuna. During my onigiri lesson we used some rehydrated dried mushrooms. Today I used a red pepper filling. I am not sure what the traditional rice to use is, but I used Jasmine rice and it seemed sufficiently sticky.

onigiri

Red Pepper Onigiri Filling
(filling for about 6 rice balls)

1 tbsp finely chopped onion
1/4 red bell pepper, finely chopped
1 tsp soy sauce
1 tsp oyster sauce
1 tsp sesame oil
1 tsp vegetable oil
pinch of red pepper flakes
1 tsp toasted sesame seeds

1. Fry onions in vegetable oil until they start to brown. Add red pepper and cook until softened.
2. Toss with remaining ingredients.

Onigiri

warm cooked rice (I started with 1 cup dry rice)
large pinch of salt
filling
seaweed sheet

1. Toast the seaweed sheet by holding it about 2 inches above the element in your stove. (This works even if you have an electric stove like I do.) You will know the sheet is toasted because it will crinkle and become a brighter green.
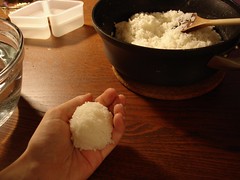
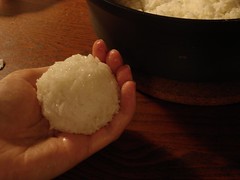
2. Wet your hands. Make a little ball with the rice. If you have ever made a snow ball, you will find this strangely familiar.
onigiri

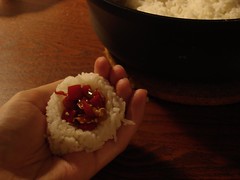
3. Next make a little dimple in the rice ball. This will flatten the ball a little.
onigiri

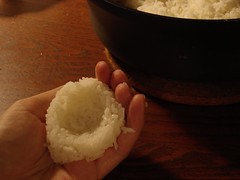
4. Put the filling in the dimple. Don't put in too much filling.
onigiri

5. Add some more rice to cover the filling to make a larger ball.
onigiri

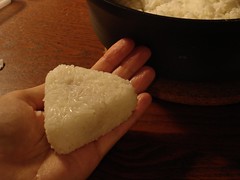
6. If you don't have a rice mold, skip this step. Otherwise, wet the rice mold and place your ball in it. Then squish the mold top on.
onigiri

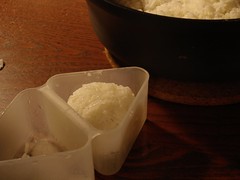
Look how cute it comes out!
onigiri

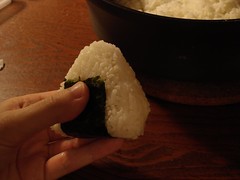
7. Wrap the rice formed rice ball in seaweed. You can cover the ball completely, or you can just cover a strip. This strip makes a little non-sticky handle.
onigiri

Thursday, January 04, 2007

Actually Delicious Lentil Soup

I eat a lot of lentil soup. It's cheap - if not exactly cheerful - and a good source of fibre and vegetarian protein. Lentil soup was basically invented for health conscious grad students. However, even though I make it all they time, I have never made a truly delicious one until now. The problem with lentils is they can taste "earthy". My strategy to keep things from tasting like dirt is to put as much tasty stuff in the broth I cook the lentils in as I can and hope for the best.

I used a mix of lentils, about 1/3 a cup of brown lentils and 2/3 a cup green lentils. In general I prefer the taste of the green lentils, but I have the brown ones to use up.

I roughly followed a recipe from the Zuni Cafe Cookbook, but I had the small piece of left over beef to use up. This recipe was the result.

Sadly, even though the soup was tasty, it is impossible for me to take a good looking picture of lentil soup.
This recipe makes 4 servings.

Delicious Lentil Soup

6 oz beef cut into 1 cm cubes
1/2 carrot cut into lentil sized pieces
1/2 onion finely chopped
1 red pepper also cut into lentil sized pieces
2 cloves garlic, minced
1 bay leaf
4 cups chicken stock, vegetable stock or water
1 tbsp oil
1 cup lentils, picked over

1. Brown beef in a dutch oven, in batches if the pot seems like it will otherwise be crowded. Remove beef and reserve, fry onion until it starts to turn golden. Add 1/2 cup of water to the pan to deglaze it.
2. Return beef to dutch oven and add bay leaf, garlic, carrots and red pepper. I also added a big pinch of kosher salt. Add 2 more cups of liquid and the lentils.
3. Cook covered for about 35mins until lentils are soft, stirring occasionally. If you notice the lentils have absorbed most the liquid, add a little more water or broth .

I reserved a little broth because I find the leftover soup will continuing to absorb liquid. Then when I am going to eat it the next day I add a little broth to thin it out.